Sunday, June 24, 2012

Building a Rain Chain Fountain

A rain chain is an ornamental accessory that replaces your gutter down spout.  Instead of the typical hollow, metal water shoot, a decorative chain is hung from the gutter, slowing the rain before it finally hits the ground.  Zinger Hardware carries an excellent variety of rain chains.  View some of the options available at their online supplier, RainChains.com.

Rain chains are great when it's raining, but sometimes rain can be a little hard to come by here in Central Texas.  Okay, rain can be really hard to come by.  If you miss the sound of rain, building a recirculating rain chain fountain can keep it raining all year round, and you don't even need gutters.

I first saw the recirculating rain chain fountain idea demonstrated at the Hill Country Water Gardens.  This style of fountain can be built using a disappearing fountain basin.  You can purchase a basin like the one I bought at The Natural Gardener.  The ready made basins provide for easy installation and come with everything you need.

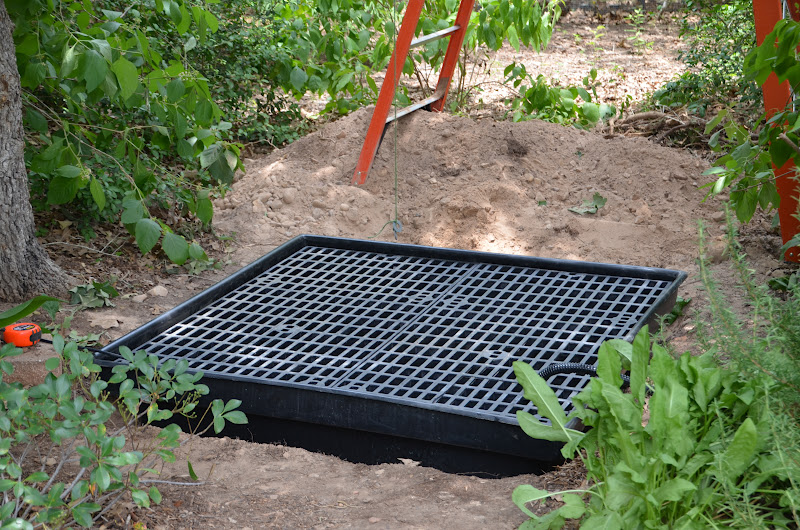
For this project, I'm using a 4 foot square basin that is 1 foot deep.  While digging the hole, we hit some tree roots and decided not to sync it flush with the ground.  This is not a problem with the rigid plastic basins, since rocks can be piled up later to hide the basin.  After digging the hole, placing sand in the hole will make it easier to level the basin.


When the basin is level, add the cinder blocks, which will support the grate, urn and rocks that will be added later.


To create the effect of water splashing through a rain chain, the water will be pumped through a hose to the top of a tree branch.  The rain chain will hang from the branch and splash into an urn. The idea is to hide all of the hoses and equipment, so the water appears to magically drip from the tree.

Determining the power of the pump needed for this project was challenging.  Pumps are rated for vertical lift, but this rating turned out to be more of a guesstimate where this project was concerned.  We needed to get the water from the reservoir to the top of the tree branch with just the right amount of force.  After trying 3 pumps we finally got the right amount of power.  

We started with an 1800 GPH pump which sent the water rushing into the rain chain with the force of a fire hose.  We installed a ball valve, shown below with the blue on/off knob, to reduce the flow of water into the hose.  With the 1800 GPH pump, we had to reduce the flow to the point where the pump whined, but the flow was still too forceful.  

We decided to switch to a 900 GPH pump.  This pump didn't have enough vertical lift to raise the water to the top, so no water came out of the hose at all.  

Finally, we tried the 1200 GPH pump with success.  The ball valve helps lower the water pressure slightly to reduce splashing, but still moves the water to the top of the rain chain.  It's important to get just the right amount of splash.  You want to hear the water noise, but you don't want water going everywhere, which will empty the reservoir quickly.

The tree branch is 13 feet 7 inches above where the urn will sit.  Eighteen feet of black tubing was used to cover the distance from the pump in the basin, up the tree, down the branch, and finally, into the rain chain cup.  Zip ties with small pin nails were used to secure the tubing to the tree.


To keep the rain chain centered in the urn, weight it to the bottom of the urn with a brick or rock.  Prior to setting the basin, urn and chain in place, you might try hanging a string with a washer attached to the branch to help visualize the project's center point.  With everything lined up and the pump installed in the reservoir, it's time to add water. 

The urn was purchased at The Great Outdoors during a 20% off sale.  I got great deal and I'm happy with how the coppery flecks in the urn seem to tie in with the color of the rain chain's hummingbird cups.    

The test run shows good water flow, which can be adjusted with the ball valve.  The pump is on a timer which allows the fountain to run in the late afternoon and early evening.  Reducing the amount of the flow and the numbers of hours running will help lessen water loss and minimize the need to refill the reservoir.

The final step in this project is to add rocks and plants.  Rocks hide the basin and plants soften the look. We used bull rock leftover from a previous project.  The existing plants helped make the project feel established, but we installed some Fern Leaf Bamboo behind the fountain to make it feel complete.

Interestingly, wildlife was immediately attracted to this water feature for bathing as well as a quick drink.  The rain dripping down the chain acts as a birdie shower, and since the overflow at the edge of the urn is slow, it's a great place to perch and grab a drink.


Sunday, June 10, 2012

The Fairy Bistro Set

My husband and I are working on a new fountain project.  We needed a pump and some helpful advice, so we took a trip to the Hill Country Water Gardens and Nursery in Cedar Park.

Hill Country Water Gardens is almost an hour drive for me, so I don't go there often.  They have expanded so much over the years.  I'm always amazed when I pay them a visit.  There are lots of cool fountains, statuary and plants, but what do I absolutely fall head over heels for?  A fairy bistro set.

I really didn't have any intention of building a fairy garden.  Like I said, we already had a fountain project that we were working on, but that bistro set, with it's cute, little cloche bell jar, spoke to me.  It said, "Take me home and build a fairy garden."  Must have been the little people.

Fairy gardens are miniature gardens that are assembled in large shallow containers. I've seen them constructed in Radio Flyer wagons and incorporated into the landscape.  Both of those are cool ideas, but for my first  fairy garden, I'm going to use a large shallow pot.

My plan is to have a small water feature divide the container.  I decided to build a small pond with stream using a plastic liner so it will hold water.  This did not work as well as I'd hoped.  The soil in the container was just too loose and crumbly.  To add structure to the stream and pond, I recycle an egg carton and a cool whip container to create support, then, lay the plastic on top.


I can already see that hiding the plastic is going to be tricky.  I decide to plant the little mosses and think about how I can make this better.  I add my little fairy bird bath and my windmill, and head off to find some more stones.  Luckily, I have lots of little rocks and pea gravel around the yard.

To finish up the display, I added a cactus, a sedum, and a wooly thyme.  I've added lots more rocks to try to hide the plastic liner, but I'm just not satisfied with the water feature.  At least it seems to hold water.

So, I say goodbye to the little pond, and start my redesign.  I decide to go with more of a dry creek look, and start working on a little arbor to cover the bistro set.  I found the perfect piece of leftover flagstone for a little bridge over the creek. 

The arbor is constructed with twigs that are lashed together with heavy duty brown thread.  I added a touch of glue for extra strength in the corners, and a little dab for each of the twigs which make up the roof.


Perfect!  I think this fairy garden shows off the little bistro set to it's best advantage.  I hope the fairies are happy!


Saturday, June 2, 2012

Artichokes in Bloom

The Globe Artichoke plants (Cynara scolymus) were very productive this year.  We gorged ourselves on these wonderful, edible thistles and still had plenty for a fabulous flower show.  In my opinion, these are some of the most spectacular flowers you will ever lay your eyes on.  Let me know if you agree.

The artichoke is best eaten when the globes are fully developed, but still tightly closed.  Steamed and served with butter and lemon juice, this tasty vegetable is a real treat.

As the artichoke prepares to flower, the edible scales fold back and the center pushes open.  Finally, the beautiful purple petals begin to appear.


A succession of blooms appear on the same plant.  One immature bud lags behind and finally, all four bloom at once.


"There is no spot of ground, however arid, bare or ugly, that cannot be tamed into such a state as may give the impression of beauty and delight." - Gertrude Jekyll

After weeks of bloom, the last of the humble artichoke thistles fades till next year, but the memories of these truly spectacular flowers are captured forever in my mind.