Sunday, October 30, 2011

Greenhouse Build - Week Two

Today was a beautiful Fall day in Central Texas.  The weather was picture perfect for spreading fresh mulch and working the garden.  The new greenhouse, still in progress, looks over the vegetable garden, where a freshly trimmed up wisteria arbor looks neat and tidy.


Week two finished up with painting the frame and installing the windows.  Progress was made on the roof framing and installation of the clerestory windows.


A back view of the greenhouse shows the 6X2 vertical slider windows installed.  Large polycarbonate sheets lean against the building, ready for installation as soon as the fasteners arrive on Monday. 

If all goes well, the project will wrap up in week three.  The roof will be completed and the polycarbonate will be installed.  The automatic vent openers, exhaust fan, and ventilation shutters will be installed as well. Can't wait!

Thursday, October 27, 2011

A Greenhouse Miracle

My greenhouse progress has all but slowed to a crawl.  The contractor has added a bit more to the roof, but has been focusing on painting the primer coat.  The reason for the slow down hinges on 2 things: lack of windows and fasteners.  The windows were not due to arrive until November 3rd and I was having difficulties obtaining the polycarbonate fasteners I ordered 2 weeks ago.


Miracle of miracles the windows came in a week a early.  We picked them up today.  The polycarbonate fastener company has promised the fasteners by COB Monday, so everything is coming together.  With the windows now on-site, the contractor has promised exciting progress for tomorrow.  He's bringing in 2 assistants to wrap up the painting and install the windows.  I can't wait!

Sunday, October 23, 2011

Greenhouse Build - Week One

My greenhouse project is underway.  The new greenhouse will be 16X24 with a 8 foot side walls, and a 14 foot ceiling with clerestory roof windows.  The 5 clerestory windows will open with solar automatic vent openers.  The wall material will be 8 mm twinwall clear polycarbonate with a generous amount of windows thrown in for human ascetics as well as ventilation.  Additional ventilation will be provided through an exhaust fan/shutter system.

For this project, I'm acting as a quasi general contractor.  This means I'm responsible for purchasing all the materials, coordinating deliveries, making sure the carpenter has the materials to proceed with the build, approving design considerations and, of course, paying people.  My credit card has never had so much exercise.

I had hoped to purchase used windows to keep cost low, but that didn't pan out like I had hoped, and I had to purchase most of the windows new.  If you want to use old windows and other re-use items, it's necessary to plan and collect these items over a period of time.  Unfortunately, when your shopping for used material, it's pretty hit or miss.  I really want to get this greenhouse built before the first freeze, so I'm sacrificing economy for expediency.  I was able to purchase the windows for the clerestory on CraigsList and patio door was an inexpensive in-stock item at Lowes (shown below).  The other windows were all purchased new and are not due for delivery until the first week in November.


The greenhouse floor is decomposed granite with a 4"X4" foundation.  The foundation is bolted to concrete for additional support.  As fitting for a greenhouse, the contractor recycled some of my 5 gallon plastic pots to set the concrete.

The site is not completely level, so the completed foundation will be back-filled later.

Framing is an exciting day.  So much seems to get accomplished and you can start to envision what the greenhouse will look like.  The front of the greenhouse pictured below shows the space for the door (far right), as well as the space for the front windows.  The front windows will consist of 3 - 4X2 foot sliders and 3 - 4X4 non-operable picture windows.

The back of the greenhouse framed for the 3 - 6X2 slider windows.

The first roof truss is in place showing the high roof and the flat area which will soon accommodate the clerestory windows.

So, what's in store for next week... completion of the roof, painting, and installation of the clerestory windows.  Some of the polycarbonate may be installed, however, the poly fasteners have been delayed, so I'm going to say a little prayer that they come quickly.

Friday, October 21, 2011

Every Greenhouse Starts with a Dream

I am embarking on a fabulous adventure.  Every time I think about it, I smile.  I'm finally getting the greenhouse I have wanted for a very long time.

When we moved to our current home, one of the first projects we completed was a small greenhouse.  We built it from a 6X8 cedar greenhouse kit.  The kit came with 2 - 8 foot benches and 2 automatic vent openers; one on the roof and the other on the back wall.  This has been my greenhouse for almost 20 years.  It has held up surprisingly well, though I outgrew it years ago.  The inside framing is still structurally sound, but the outer trim and polycarbonate have both significantly degraded over the years.  Rather than throw it out, we've moved it to a shady location and are going to convert it to a cottage style potting shed.

The basic design of the new greenhouse came from a website that offers free plans (http://www.buildeazy.com/greenhouse_imp.html).  The clerestory windows and the high sloping roof attracted me to the design.  The primary problem with the design was the size.  I knew I needed a very large greenhouse and the Build Easy plan for an 8X10 foot greenhouse was just too small.  Below is a sample of a build easy greenhouse constructed from the plans as provided on the web.

I wanted to build the biggest greenhouse I could afford, but the second factor in selecting the size was available space.  In order to take advantage of the large slanting roof of the Build Easy plan, it was important to site that side of the building facing to the South.  The perfect site overlooking my vegetable garden would accommodate a 16X24 foot greenhouse.

Did I mention that site was already home to our rather large composting operation?  My husband, bless him, moved all the cinderblocks and compost to a new location so I could have this coveted spot.  The new compost bins were rebuilt bigger and better than before and he got a new tractor out of the deal, so it's all good.

The site of the new greenhouse had to be leveled and prepped for a decomposed granite base.  A box blade tractor attachment was used to assist with grading the site.

The site was measured and partially roped off.  The granite was dumped in place and later spread using the box blade.

Six yards of granite were used on the site to get a depth of 4 inches.

The contractor for the project builds greenhouses, sheds and playscapes.  He really seems to love his work.  I shared with him my vision for the new greenhouse.  I wanted 8 foot side walls and high ceilings, 8 mm twinwall polycarbonate for energy efficiency, and lots of windows including 5 clerestory windows that will open with solar powered vents.

My rough drawing below shows 5 - 4'X2' clerestory windows, 3 - 4'X2' vertical sliders, 3 - 4'X4' fixed pictures windows, and a 6 foot patio door.  The rear of the building (not pictured) includes 3 - 6'X2' vertical sliders for cross-ventilation.  In addition to the windows, the greenhouse will have a 24" exhaust fan, combined with 2 - 20 inch shutters.

So, this is the dream, soon to become reality...

Sunday, October 16, 2011

The Southern Pea Meets a Yankee

You'se guys who grew up here in the South may already know about these wicked, tasty veggies called black-eyed peas, but this New England Yankee only recently discovered them.  In the interest of full disclosure, even though I've been living here in Texas since 1983, I was convinced I didn't like black-eyed peas.  Turns out I was wrong.

Black-eyed peas, also called southern peas, crowder peas or cowpeas, are an easy to grow legume.  The peas can be planted in Central Texas from late April through August.  They are very drought and heat tolerant.  Harvest is in about 85-100 days depending on variety.

I decided to grow black-eyed peas because there's very little that will grow in the heat of a Texas summer, and I thought my chickens might like them (they do).  I planted my first crop in June, and I liked them so much, I planted a second crop in August.  The June crop grew fast and tall, so when I replanted in August I decided to use some fencing as an improvised trellis.  The August planting did not grow as tall, but the peas were still plentiful.

The peas can be harvested young, when the swollen pods are still green, for eating fresh.  

Harvested pods can be stored in the refrigerator until you are ready to shell them.

Shelling black-eyed peas takes time and is best done with a couple of extra hands.  Sometimes you can get lucky and find someone willing to help.  I call this picture, "will shell for football".

Shelling operation underway.

When the pod strings are removed, sometimes you get lucky and they slide out into the bowl.

My favorite way to eat black-eyed peas is with onions and bacon.

When the onions are tender, add the peas and cover with water.  Bring to a boil, then reduce heat and cover for about 20 minutes.  Yum, I can't wait for next year.  I'll be sure to grow black-eyed peas again.

Wednesday, October 12, 2011

Critters in the Garden

Here in Central Texas this has been a difficult summer for gardeners and the critters who share our gardens with us.

This summer was so dry, bees visited my bird bath for the first time.  I thought they were thirsty, but apparently, the bees take the water droplets back to the hive for use as a sort of evaporative cooling system. 

Word got out and more bees came.  I'm usually better about cleaning my bird baths, but this year... well, how do you clean a bird bath full of bees?

Luckily, I have more than one bird bath, because this was the kind of summer where even the hawks felt like a swim.  This hawk came regularly throughout the summer to drink, swim, and do a little hunting now and then.

It was so hot, the frogs decided to become birds.

Even the lizards tried to blend into the furniture.

And, the squirrels, well, they tried to stay cool the best they could. 

The only critters who seem to take the heat in stride and go about their business was the road runners.  Beep! Beep!


Sunday, October 9, 2011

Meet the Chicks

In the world of the chicken, the pecking order is very literal.  Chickens at the top of the pecking order do all the pecking, and chickens at the bottom of the pecking order get pecked.  Sometimes the pecks are gentle reminders that those with privilege can belly up to the feeder at the choice location.  Other times the pecks must strike a nerve, because noisy scuffles erupt as the peck-ee decides to fight back.  

Here's the chickens in pecking order...
Ginger is a golden sexlink.  She is the head chick and has been since day one.  A once benevolent queen, Ginger has been a little cranky this summer, pecking her sisters in a most unfriendly way.  I’m hoping it’s just the heat, and once the weather cools down, she will chill out (so to speak).

Dottie is a silver laced wyandotte.  She is Ginger’s lieutenant and right-hand chick.  Dottie is the most handsome chicken in flock with lovely feather coloration and a plump figure.  She sternly watches over the coop for any signs of trouble, but seems to let Ginger handle any needed discipline.

Cocoa is a cuckoo moran who was a late comer to our flock.  She was a replacement for Dottie’s sister, Wynnie, who we think died of egg impaction.  Cocoa is a scrappy chick, who has fought her way up the pecking order with pure determination.  She really thinks she is in charge, until Ginger reminds her differently.  Those reminders have cost her a few neck feathers lately.

Pansy and Petunia are my middle children (I mean chickens).  They are welsummers, which are known for their dark terracotta colored eggs.  Petunia was the first and only chicken so far to become broody.  A broody hen experiences an overwhelming need to sit on eggs until they hatch.  She stops laying eggs herself, refuses to leave the nest, and eats and drinks very little.  Petunia has actually been broody twice.  Poor thing wants to hatch some babies, but without a rooster there’s not much chance of that happening.

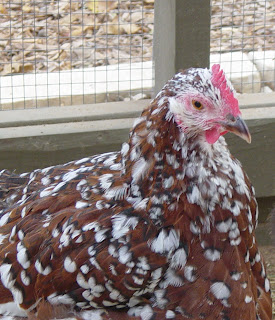
Last but not least is Barnie, so named because she is a barnevelder.  Normally, a very attractive breed, Barnie has always been a bit of an ugly duckling.  She has a very large crop goiter, but still manages to get around.  Since the beginning, Barnie has been at the bottom of the pecking order.  She doesn’t seem to mind and actually seems to prefer people over chickens. 

In the picture below, Barnie has dug out a hole for a dust bath.  Unfortunately, she didn't get to enjoy it.  Once the other chickens saw what she was doing, she was forced out of her hole and the others scrabbled for hole privileges.  Thus is the life of those at the bottom of the pecking order.

"It's okay Barnie, I'll get you a special treat later."

The gang of six enjoying a few fresh black-eyed peas from the garden.


Saturday, October 8, 2011

Let a Hose Lend You a Hand

Don't throw away that old garden hose.  Recycled hose can be very useful in the garden.  Two great uses for an old hose are as a bucket handle and as a tree protector during staking.

Bucket Handle

Turning an old hose into a bucket handle can be very helpful.  The original handles are usually made from a rigid plastic that is not very comfortable on the hand and generally, does not hold up for very long. 

To make a bucket handle, start with a section of hose, a good pair of scissors, strong tape, and some buckets or containers that need new handles.

Cutting the hose can be difficult.  I really like the Fiskars kitchen shears for this job.  The kitchen shears have a special design for cutting through bone which makes them pretty handy.  A box cutter can also work well if you don't have sharp, heavy duty scissors.  Cut the hose in 3 - 4 inch lengths for a standard 5 gallon bucket.

Slice through the hose segment lengthwise, then slide onto the bucket handle.

Run a strip of tape around the hose to secure it to the handle.  Be sure to completely cover the cut portion of the hose. 
 

The finished handle will get more comfortable with use.  Additional layers of tape can help smooth out any bothersome creases.

Tree Protector (when staking)

Staking a tree is usually not recommended, however, there are times when staking may be necessary.  I purchased a yellow flowering Texas senna because I wanted to attract the cloudless sulfur butterfly.  My intention was to grow the plant as a tree, but before I could get started with training, the plant decided to be a bush.  I tried to convince the plant it was a tree, but all that did was confuse it.  In the process of removing the multi-trunking branches, I weakened it to the point where it would not stand on it's own and staking was required.


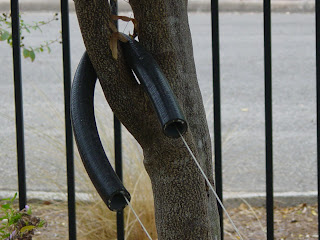
Rather than wrap the twine directly around the tree, I fed the twine through a length of hose.  A large saftely pin is a handy way to feed the twine through the hose.  The hose is soft and pliable and will not damage the bark as easily as the twine would.

Eventually the twine can be loosened to test if the tree is ready to stand on it's own.

Thursday, October 6, 2011

Taj Ma-Coop

My backyard is racoon central, so I knew when we decided to raise chickens that we would need a predator proof coop.  I found some great ideas on the web to help us build this 8 X 12 coop and run combination.  First, we layed out a 4"X4" foundation and built the frame.

Painting the frame will protect the wood and make it look nice.

Hardware cloth, also called 1/2 inch wire, is secured to the frame with screws and washers.  The chicks will be safe as long as the racoons don't figure out how to use screw drivers.

The hardware cloth is complete and the siding is installed.


The trim is added and a rock edging is installed around the coop.  Wire under the rock will further discourage digging pests.
 

A good locking mechanism secures the door.

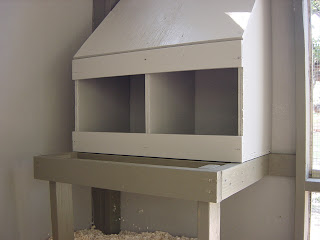
The coop interior includes a roost, nesting box, and ladder.

The nesting box has a small roost area to make it easier for the birds to enter the boxes.

The L-shaped roost includes removeable poop boards for easier cleaning.

The finished coop has been in use for a year and half.  In the absense of an actual rooster, Roger the metal rooster stands guard over the girls.